

My neighbor Irene is a meticulous cook and an avid traveler.
When these two passions meet, her friends benefit, and this was the case last week when she returned from a trip to Italy, having taken a pasta cooking course in Bologna. She made an abundance of ravioli with her newly acquired knowledge and skill.
The instructor was passionate about her subject; in one case, when the ravioli finished cooking before the class was ready to eat them, she insisted they all stop in their tracks and dig in to ensure that the pasta was eaten at absolute peak perfection. She also informed them authoritatively that lasagne Bolognese must be made with spinach pasta and, if it is not green, then it is inauthentic.
Rules aside, Irene came back eager to share, and who was I to quash this motivation?
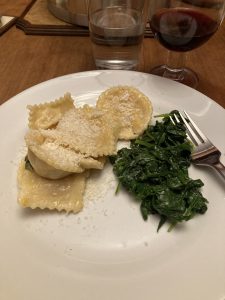
The butternut squash ravioli was delightful, a perfect autumn supper, and we are ready to continue sampling her creations as she explores the entire canon of pasta shapes and flavors and perfects her craft.
The technique described for the dough below is more of a guide than a recipe. It details how to make the pasta, can be upsized depending on your crowd and can also be cut however you wish.
If you prefer to make lasagne, just use the sheets. Pappardelle? Just cut the sheets into ribbons. And if you want to make ravioli, the recipe for a perfect autumnal butternut squash filling and sage butter sauce appears below. Mangia!
 Pasta
PastaA note on the flour: 00 flour is a finely ground Italian flour used in pasta. It is available in many supermarkets, specialty shops and online. The quantity below is an approximation; the conversion from the metric system, along with the variation in egg size will generate some inconsistency so it is necessary to gauge the flour based on feel. It should not be overly sticky, should roll out well, the shapes should hold together and, when laid out, should begin to dry.
Another note on the process: Irene described an enormous wooden board and an enormous wooden rolling pin that “La Profesora” used to demonstrate the technique. Most American kitchens are not equipped with such accouterments, nor would they have space to store them. Upon returning, Irene ordered a dough hook and pasta roller attachment for her mixer and says they work “like a charm.”
Heaping 1½ cups 00 flour
2 large eggs plus 1 egg yolk at room temperature
½ teaspoon finely ground table salt
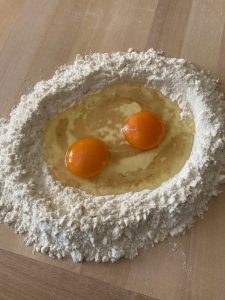
On a large board or clean work surface, mix the flour and salt, and form it into a volcano shape.
 In a small bowl, lightly beat the eggs and yolk, and pour them into the center of the flour mixture. Using a fork, gradually work the eggs into the flour. When a dough begins to form, ditch the fork and start pressing the dough. If the dough feels sticky, add more flour in small amounts. Knead the dough for 10 minutes; it should be smooth and not sticky. Cover or wrap the dough, and let it sit on the counter for at least 30 minutes, or wrap it and refrigerate it overnight.
When ready to move to the next step, cut ¼ of the dough off the ball, and leave the rest of the dough covered. Flatten the piece of dough, sprinkle it with some flour and press it through the pasta rollers (or roll it by hand with a rolling pin).
If using the roller, start on setting 1. Continue passing the pasta dough through the roller, making the setting smaller each time. Ravioli should reach setting No. 6.
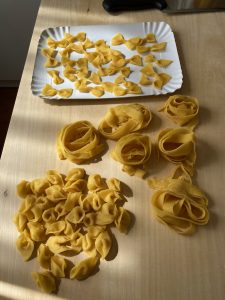
When the sheets are complete, place them on a floured surface to avoid sticking, and repeat this step with the remaining pasta. When the pasta is all rolled to the desired thinness, cut it as desired; for pappardelle or fettuccine, a pizza cutter comes in handy to slice the long ribbons. For ravioli, you can hand-cut the shapes with a pastry cutter or use a mold. (Irene suggested a YouTube video by the “Pasta Grannies” to demonstrate this process most effectively.) For lasagna, cut the squares to fit the pan and layer as desired.
 A note on the cooking: Authenticity requires large pots of generously salted boiling water to cook the pasta. For filled pasta like ravioli, the boil should be gentle to prevent the delicate ravioli or tortellini from breaking. Ribbon or non-filled pasta will cook much more quickly, but Irene also learned that the old convention “when it floats, it’s done” is not accurate. La Profesora advised that cooks remove a piece from the pot and keep checking for al dente doneness. It seems that this is both an art and a science!
Butternut Squash Filling
This makes more than enough for ravioli for two; use the surplus as a side dish.
1 butternut or 2 honeynut squash
Oil to coat
2 tablespoons grated Parmigiano-Reggiano
¼ teaspoon garlic powder
A generous sprinkling of freshly ground nutmeg
Salt and pepper to taste
Heat your oven to 375 degrees F. Line a baking sheet with parchment.
Cut the squash in half vertically and scoop out the seeds. Lightly coat the squash with oil, and roast, cut side up, for about 45 minutes until soft. Scoop out the flesh, and mash it with the remaining ingredients.
Fill the pasta with this mixture as desired and cook as directed above.
Sage/Brown Butter Sauce
¼ stick butter
A handful of fresh sage leaves
In a large skillet, melt the butter and toss in the sage leaves. Let the butter coat the leaves, and crisp slightly.
When the pasta is done, gently place it in the skillet with the sage and butter. Add a splash or two of the pasta cooking water to spread the butter sauce.
Serve the pasta with generous scoops of additional grated cheese.
